This guide will help you set up your poster and design it according to university branding standards.
1. Software
2. Save as PDF
3. Checking/Choosing Size
4. Logos
5. Submitting an Order
Software
We strongly recommend creating your poster in a program that is intended to create printed materials. Other programs, such as PowerPoint, may be able to be used. Still, since they are intended to be used for digital presentations, not printed material, there may be additional difficulties utilizing this software.
We have templates available on our templates page for each of the recommended programs.
Recommended:
- Microsoft Publisher [W, V, L]
- Apple Pages [M, SL]
- Adobe Illustrator [W, M, SL]
- Adobe InDesign [W, M, SL]
- Scribus [W, M, V, F]
- Inkscape [W, M, V, F]
Availability [W = Windows; M = Mac; V = vDesk; L = Computer Labs; SL = Select Computer Labs; F = can be downloaded for free]
Not recommended and/or not possible to use:
- Microsoft PowerPoint - can be used, but not intended for this purpose.
- Apple Keynote
- Microsoft Word
- Microsoft Excel
Save your poster as a PDF.
These are basic instructions for saving your file as a PDF. These steps could vary depending on what programs you're using. For more specific instructions, see the instructions included with our templates.
Windows
- Go to File
- Choose “Save As”
- From the dropdown menu labeled “Save as type,” choose “PDF (*.pdf)”
- Click Save.
- Be sure to open and review your PDF before submitting your order.
Mac
- Go to File > Page Setup.
- Make a note of the document's size or slide (your poster) and click the Options button. A new window will open.
- Click the plus icon in the lower left.
- In the Paper Size field, enter your slide’s shortest dimension as the width and the longest dimension as the height. (It does not matter if your poster in portrait or landscape: shortest=width, longest=height).
- Select your new custom size, and click Portrait or Landscape to match the layout of your poster. Then click, OK.
- Go to File > Print. A new window will open.
- In the lower-left corner of the window, click the PDF button, and choose Save as PDF.
- In the new window that opens, make sure that “Hide extension” is unchecked. To view this option, it may be necessary to expand the window by clicking the small triangle next to your file name. The triangle should be pointing down.
- Click Save.
- Be sure to open and review your PDF before submitting your order.
Choosing & Checking Poster Size
When printing wide format prints, including presentation posters, we need the PDF to match the size that has been requested. The best way to ensure this happens is to create your poster at the size you want to be printed from the start. There is no standard size for presentation posters, but the most common size is 48" x 36" (4ft x 3ft), which is our templates' size. If you need a different size, please feel free to modify any of our templates to match the size you need.
Once you have completed your presentation poster, be sure to email it to us saved as a PDF. Instructions for saving your file as a PDF are included with all of our templates.
After saving your poster as a PDF, you should check to ensure that it is saved at the correct size. Also, check that everything looks as it should before emailing us the PDF.
To check the size of your PDF:
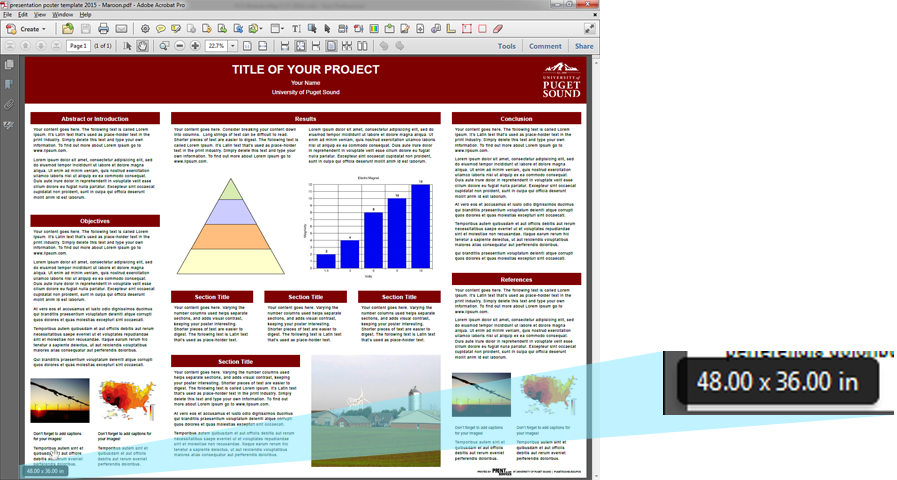
- Open your PDF in Adobe Acrobat or Foxit PDF Reader (available through vDesk).
You can also use the professional versions of this software: Acrobat Pro and Foxit PhantomPDF. - Move your cursor to the lower-left corner of your screen. A small box will appear, displaying the dimensions of your PDF. (see example below)
An alternate method for Mac users
In addition to the previous method, Mac users can also use the following method to check the size of a PDF:
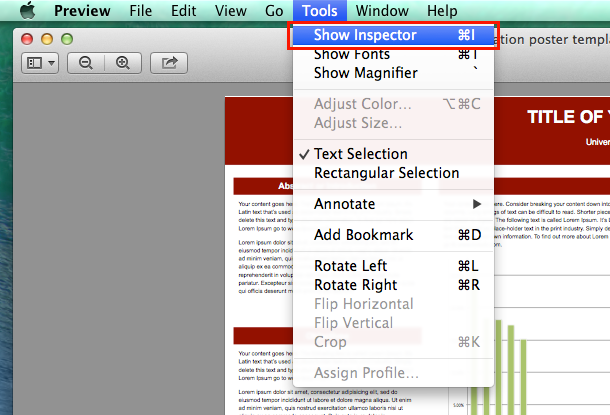
- Open the PDF in Preview
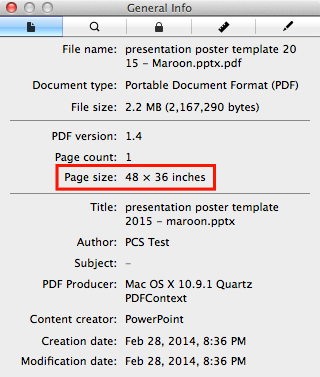
- Go to Tools > Show Inspector.
- A new window will open. The measurements for Page Size indicate the poster's size.
Logos
Adding logos to your poster is a great way to indicate what institutions, organizations, or businesses you are affiliated with. Most institutions have branding guidelines that cover the usage of their logos, and the University of Puget Sound is no exception.
Below are a few examples of correct and incorrect usage of the university logo. For more comprehensive guidelines, visit the Office of Communications website.
Correct Usage
Please do include the university logo.
Incorrect Usage
Do not use the university logo more than once.
Incorrect Usage
Do not use the university seal on your poster.
The university seal is reserved for use exclusively by the Office of the President.
Submitting an order
To submit an order, follow the same steps outlined on our Submit an Order page.
Please also note:
Check Your PDF
Before submitting your order, be sure to look over your poster to ensure everything looks okay (no cut-off text, typos, missing pictures, or graphs.) Also, check that your poster matches the size you want to be printed.
Payment
If you are paying for your poster personally, we will require pre-payment. If the order is charged to a department or club, please submit the order via our online order system.
Turnaround Time
We typically need 48 hours (2 full business days) to complete a wide format print order. If you need your poster sooner than that, please contact us as soon as possible. Posters are printed on a first-come-first-served basis. Demand can vary depending on the time of year. Occasionally, depending on demand, we will need more than 48 hours to complete a wide format print order.
If you have any questions, contact Print & Copy Services at copyservices@pugetsound.edu or 253.879.3737.