Put simply, PCR is like photocopying regions of DNA. Briefly, primers (short sequences of DNA) that match the beginning and end of a particular gene of interest (or part of one) are mixed with the extracted salmon DNA, along with a DNA polymerase enzyme and a few chemicals (including MgCl2 and a salt buffer) that help the reaction work properly. The primers were designed so that there is a forward primer that matches the 5' end of one of the complementary strands of the salmon DNA, and a reverse primer that matches the 5' end of the opposite DNA strand. All that the thermal cycler does is change temperature for certain lengths of time, which allows different parts of the PCR reaction to occur. First the temperature is raised to 94o C (nearly boiling!) and the strands of salmon DNA double helix break apart (remember they're only held together by relatively weak hydrogen bonds). This step is called the denaturing step, (that's what it's called when DNA strands are forced apart). Then the temperature is cooled to somewhere between 50o and 60o C (depending on the primer sequence), which allows the primers to bind to their complementary sequences on each DNA strand (called the annealing step). Next, the temperature is raised to 72o, the temperature at which the DNA polymerase enzyme works best. This DNA polymerase is obtained from bacteria that live in hot springs, thus the high temperature at which it works. The name of the bacterium is Thermus aquaticus and the DNA polymerase derives its name from the scientific name – Taq polymerase. The DNA polymerase starts at the primers and "reads" the rest of the strand, filling in all the correct matching nucleotides. In a minute or so, the enzyme has completed the complementary strand using the inital strand as a template (called the extension step).
This cycle is repeated about 30 to 40 times, with each cycle producing a doubling of the region of DNA between the two primers. Theoretically this process would produce 240 copies of the region!! Of course the reaction never reaches this theoretical limit, but you will end up with hundreds of millions of copies, which show up as a bright band on a gel (hopefully!), and is enough to later chop up with a restriction enzyme (next section). If a bright band does not show up, then a second round of PCR can be performed using a small amount of the first round reaction to generate a larger number of copies.
The following is written using the Gonadotropin locus as an example. Conditions vary slightly for other loci. Click here for more information about Gonadotropin locus.
Protocol for using liquid Taq polymerase:
(Teachers may request from Qiagen Corp. a DNA extraction kit (enough for 50 samples) and Taq polymerase kit. Call Sonia Dobias at 1-800-426-8157 Ext. 23544)
The sequences of the gonadotropin primers are: (5' to 3')
1st round primer sequences (F1/R1): 2nd round primer sequences (F1a/R1a):
F1: 5'-cat tgt cta gga cac tca c-3' F1a: 5'-gtc act ctc ctc ttc acc g
R1: 5'-tag tac tct ttg ggt aat gc-3' R1a: 5'-ggc tgc agg ctc tcg atg g
Primers are relatively inexpensive. For ordering information, see Sources section.
Note: The primers will arrive dry in eppendorf-like tubes. You will need to add distilled water to redissolve them. The amount of primer present in the tube will be printed on the tube's label. The amount will usually be around 50 nmol. You will need to make stocks of 0.25 pmol/ul for use in PCR. (Note that this is a much lower primer concentration than that used for the mussel project). Start by making a 100 pmol/ul stock by dissolving primer in 10X as much water (in ul) as you have nmol. So, if you have 50 nmol, dissolve in 500 ul of water and you will have 100 pmol /ul. (Remember, 50 nmol = 50,000 pmol. So, 50,000 pm/500 ul = 100 pm/ul, right?). Then you can dilute 1:400 to get your 0.25 pmol/ul working stock.
1) Number thin-walled 0.2 ml PCR tubes on top and side using thin permanent marker.
2) Make a "cocktail" that includes 10X PCR buffer, nucleotides, magnesium choloride, primers, Taq polymerase, and water (but not the DNA). Calculate what you would need to add to the cocktail using the following recipe. Let's say you are making enough cocktail for the class, which is doing 18 samples (just to make the math easy). You will want enough cocktail for these 18 samples plus 1 negative control (for the class). To ensure that you have enough cocktail, calculate enough for one extra tube:
Per tube x 20 (18 samples, plus 1 negative control, 1 extra) 10X PCR buffer 2.5 ul 50 ml 5 mM dNTPs 1 ml 20 ml 25 mM MgCl2 1 ml 20 ml 5’ Primer (F1) (0.25 pmol/ml) 1 ml 20 ml 3’ Primer (R1) (0.25 pmol/ml) 1 ml 20 ml Taq polymerase 0.15 ml 3 ml ddH2O 16.35 ml 327 ml Total in cocktail: 460 ml(Note: If each lab group is making their own cocktail, just multiply the "per tube" amounts by one more than the number of samples your group is doing; e.g. if your group is doing 4 samples, make enough cocktail for 5 samples, so you have some extra).
DNA: 2 ml (not in cocktail!)
3) Add 23 ml of the cocktail to each small PCR tube.
4) Add 2 ml of your DNA to the PCR tube, so the final volume is 25 ul.
5) Mix the contents of the tube by gently pipetting in and out. (If you're sure you pipetted your 2 ml of DNA directly into the rest of the mixture, no mixing is necessary).
6) Place the samples in the thermal cycler and start the cycles as instructed by your teacher. The thermal cycler will be programmed with the following general profile (the optimal cycling profile for a given thermal cycler will vary and must be empirically determined): First round: 1 cycle at 95O C for 2 minutes, followed by 15 cycles of 95 O C for 15 s, 54 O C for 40 s, 72 O C for 1 min. and 20 s; 1 final extension of 72 O C for 5 minutes. This program usually takes about 1 hour; the cycler can be programmed to hold at 4O C after the cycling is complete (if desired – not necessary). Store samples in fridge (room temp. is O.K.) until ready for 2nd round PCR
Second round of PCR:
Set up reactions exactly as above, except:
1. Use the inside primers (F1a and R1a) in the master mix cocktail, and 2. Use 2 ml of first PCR reaction as the DNA added. 3. Perform 30 cycles instead of 15.Protocol for Taq Beads
1) Obtain a tube with a TaqBead. Make sure the bead is at the bottom of the tube. If necessary, tap the tube against a hard surface to force the bead to the bottom of the tube. Number your tube on the top. Numbers on the side tend to rub off in the thermal cycler.
2) Make a “cocktail” that includes water, primer , and additional MgCl2 (but NOT the template DNA).
3) Calculate what you would need to add to the cocktail using the following recipe. Let's say you have 18 samples (just to make the math easy). You will want enough cocktail for these 18 samples plus 1 negative control. To ensure that you have enough cocktail, calculate enough for one extra tube:
Each tube will eventually get:
0.25 pmol of forward primer 0.25 pmol of reverse primer 2 mmol MgCl2 (0.5 mM added + 1.5 mM already in bead) template DNA (10 – 100 ng/ml) sterile distilled water to a total of 25 ulWe are using primers that are at a concentration of 0.25 pmol/ul.. We will use 2 ul of template DNA per reaction. (For different thermal cyclers and for different loci and different species new optimum concentrations have to be empirically determined). Here are the calculations for the cocktail:
Per tube x 20 (18 samples, 1 negative control, 1 extra) 5’ Primer (.25 pmol/ul) 1 ul 20 ul 3’ Primer (.25 pmol/ul) 1 ul 20 ul MgCl2 (25 mmol) 0.5 ul 10 ul ddH2O 20.5 ul 410 ul Total in cocktail: 460 ul DNA 2 ul (not in cocktail!)4) Add 23 ul of the cocktail to your Taq bead. For best results, let the Taq bead dissolve. You can gently flick you tube to speed the process.
5) Add 2 ul of your DNA to the tube. (If you want to use more DNA, just subtract that much water per tube from your cocktail).
6) Mix the contents of the tube by gently pipetting in and out (If you're sure you pipetted your 2 ul of DNA directly into your cocktail/Taq bead mixture, no mixing is necessary).
7) Place the samples in the thermal cycler and start the cycles as instructed by your teacher. The thermal cycler will be programmed with the following general profile (the optimal cycling profile for a given thermal cycler will vary and must be empirically determined): First round: 1 cycle at 95O C for 2 minutes, followed by 15 cycles of 95 O C for 15 s, 54 O C for 40 s, 72 O C for 1 min. and 20 s; 1 final extension of 72 O C for 5 minutes. This program usually takes about 1 hour; the cycler can be programmed to hold at 4O C after the cycling is complete (if desired – not necessary).
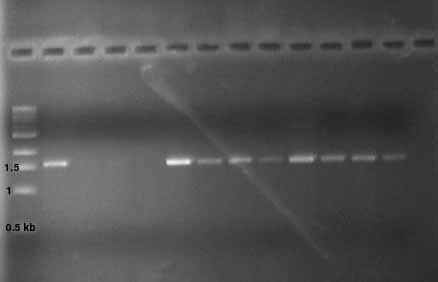
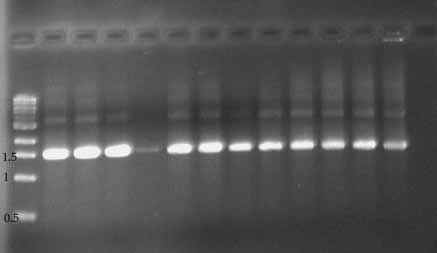
Store these samples in fridge or room temp. until you are ready run the second round of PCR. After 2nd round PCR, run 5 ul on a 1% agarose gel. The Gonadotropin amplification product should be 1567 bp in size (after 2nd round).
Second round of PCR:
Set up reactions exactly as above, except:
1. Use the inside primers (F1a and R1a) in the master mix cocktail, and 2. Use 2 ul of first PCR reaction as the DNA added. 3. Perform 30 cycles instead of 15.Primer sequences for other loci
Troubleshooting PCR (short and sweet)
Adding a second round of PCR as described above should eliminate many of the difficulties in obtaining PCR product. However, if you want to try to optimize the reactions using only one round of PCR, or if you are still having problems even after doing two rounds of PCR, here are some suggestions.
You will sometimes find that you get no amplification (no bands) or non-specific amplification, meaning that you have multiple bands. For multiple bands, increasing temperature of the annealing step and decreasing magnesium concentration may help. Sometimes decreasing the amount of starting template or reducing the concentration of the primers will reduce non-specific amplification as well. For instance, if one doubles the concentration of primers used, multiple products will become evident.
When your amplification doesn’t work, you can make sure that your reagents are good by running a positive control. The Pharmacia Taq bead kit provides a positive control that you can run along with your samples. Lowering the annealing temperature or increasing the magnesium concentration in the reaction reduces the stringency with which the primers anneal. Thus, if the non-amplification is the result of a lack of specificity between the primers and template, these measures will increase your success. Increasing template concentration and primer concentration may also help.
Contamination Problems
If a band (contamination) appears in the negative control either one of your reagents or your pipettor is contaminated. Contamination can be difficult to ferret out. If you have time to figure out where it is occurring, first, clean your pipettor and discard your cheapest reagents. Try running your PCR again. If you continue to have contamination problems, or if you don’t have time to play detective, discard all your reagents and start again. Because contamination is potentially expensive and time-consuming it pays to aliquot all the expensive reagents you use, such as primers and dNTPs.
Photos of Gonadotropin PCR product (1% agarose gel)
First Round PCR (gonadotropin gene)