Receipt Imaging attaches an electronic copy of receipts to a P-card statement. Cover letter and scanned receipt packets are emailed or faxed to Wells Fargo during the review period. The receipts can then be viewed by the approver online along with the statement and are readily available to you as the cardholder.
Receipt Imaging is only available after the Statement Cycle closes on the last calendar day of each month.
Remember that you need to print a new cover sheet each month that corresponds with that month's statement.
Three steps to receipt imaging:
- Prepping your receipts
- Retrieving the cover sheet
- Combining and Sending the Cover Letter and Receipts
Prepping your receipts
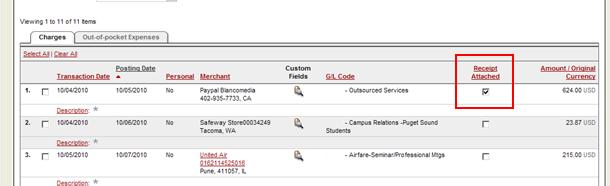
Paper receipts: Tape receipts to sheets of paper, fitting two, or three, to a page. Number the receipts, matching the transaction number shown in the “Review Open Statements” section of CCER. Use the order that the transactions are in when you first enter CCER (they can be sorted based on amount, merchant, etc, which re-orders them). See an example of numbering receipts here. If you plan to email receipts to Wells Fargo, scan them to your computer. See our scanning guide for best practices. If you plan to fax them, set them aside for now.
Online invoices: These will need to be added to the receipt packet as well. Online invoices may include emailed invoices. If you know how to combine multiple PDFs into one document, you can print them to PDF. Otherwise, print copies of these invoices.
Out of Pocket (OOP) Expenses: You may occasionally have receipts for out-of-pocket expenses. Include those in your packet, and identify them as OOP with the transaction number from the OOP tab.
Receipts Attached Box: This box, found when reviewing your statement, is to help you keep track of which receipts you have and are imaging and which transactions you have reviewed for account number and description. Checking the box has no effect on the statement review; it is merely to help you keep track of your review and imaging process.
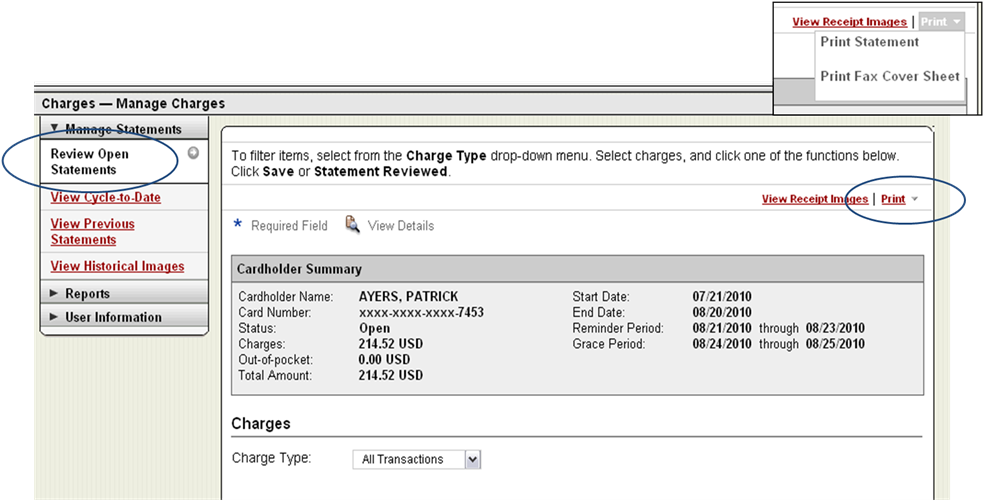
Retrieving the cover sheet
Each month you will need to print a new cover sheet that corresponds to that statement. The cover sheets are barcoded with the account number and the month.
- In CCER, go to “Review Open Statements” on the left sidebar. On the right side of the page, click on the red “Print” link which will open a drop down menu. Choose “Print Fax Cover Sheet.”
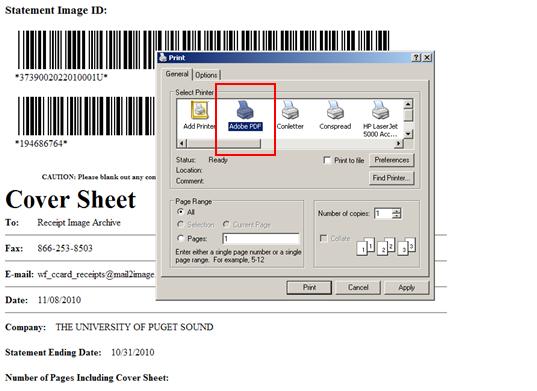
- If you plan to fax the receipts or plan to email them and use Adobe Reader to view PDFs, print a copy of the cover letter.
- If you plan to email the receipts and have Adobe Acrobat, choose Print to PDF. This saves the Cover Sheet as a PDF file on your computer.
Combining and Sending the Cover Letter and Receipts
Only one package of cover page followed by receipts should be sent for each statement.
Fax: Fax the packet to the number on the cover sheet. The fax should begin with the cover sheet, followed by the taped and printed receipts and invoices.
Email with Adobe Acrobat: Check to ensure you have PDF versions of the cover letter, receipt copies, and any other invoices. Open the cover sheet in Acrobat. Under “Document,” choose “Insert Pages” and “From File.” After selecting the receipt document, set the location to “After” and the page setting to “Last.” This will add your receipts PDF to the back of the cover sheet PDF. Repeat this until all your receipts are in one file. To reduce the file size by about half, you should OCR Text recognize your receipt packet. This option can be found by selecting Document -> OCR Text Recognition -> Recognize Text Using OCR. This is an especially important step if you are attempting to submit a large number of pages. You can then email the PDF to the address specified on the cover sheet. Be sure to attach the PDF to a new email, Wells Fargo cannot process attachments in a forwarded email. Within 15 minutes, you should receive a confirmation emails stating that the cover letter was received. Within two hours, you should see the images on the website.
Email with Adobe Reader: Check to ensure you have printed versions of the cover sheet, all receipts (taped to sheets), and any other invoices. Order these with the cover sheet on top, followed by the receipts and invoices. Scan the entire packet to your computer. Follow our scanning guide to optimize your receipt image quality. You should then have one PDF file of your cover sheet and receipts. You can then email the PDF to the address specified on the cover sheet. Be sure to attach the PDF to a new email, Wells Fargo cannot process attachments in a forwarded email. Within 15 minutes, you should receive a confirmation emails stating that the cover letter was received. Within two hours, you should see the images on the website.
Scanning Guide
To optimize receipt image quality follow these guidelines.
- Scan at 400dpi by 400dpi if possible. This option can be found in the scan settings of your scanner/copier.
- Scan to black and white, not color. The Wells Fargo imaging system does not pick up reds and blues well.
- If you are using Adobe Acrobat, reduce the file size by OCR Text recognizing the file. It will reduce the file size by about half and is especially important for imaged receipt packets with a large number of pages. This feature can be found by choosing Document -> OCR Text Recognize -> Recognize Text Using OCR. Do not use the Optimize Scanned PDF option, as this reduces the image quality substantially.